(or How To Enjoy This Fitting Event)
by Sherwood Heggen
In recent Gadget and Kinks articles regarding bottom restoration, we have gone through some major topics of restoring what time and use have destroyed. After wading through the mysteries of scarfing joints, cutting rabbets, and drilling a shaft hole, one would think all of the hard stuff is behind us. Have you considered replacing the bottom planks with new wood yet? Using the old planks is not a good idea because they are typically oil soaked, cracked, and have seen their useful life after 40+ years. Replacing with new wood appears to be a simple matter of copying the old planks and screwing them in place. Well, not so fast here. If there are new frames, keel, and chine installed, you can be sure that some dimensions have changed and the old planks are not going to be a true fit as they once were. Therefore, using them as an exact template is not a good idea. This Gadgets and Kinks is going to describe a simple method of custom fitting planks with basic tools. The type of bottom used in this subject is a soft bottom where plywood is the sub-planking and the bottom planks are duplicates of the original in size and shape. The planks are bedded in 3M 5200 and are sealed with penetrating epoxy as described by Don Danenberg in Classic Boating magazine.
Before we get going on cutting new planks, lets discuss the method by which we are going to fit the new planks. Fitting a new plank can irritate the bilge water out of you if you dont know what you are doing. So, read on before you try anything so daring on your own. We are here to restore; not destroy.
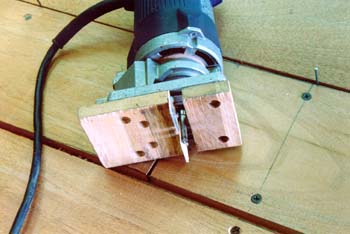 Picture #1 shows the old reliable router with an attachment used for fitting topside planks. The router uses a fair edge of the keel or a fixed plank as a guide as the bit cuts away the material of the adjacent plank for a perfect fit. It works well on topsides providing an almost seamless appearance. On bottom planks, this method provides a means for making an even seam gap for expansion with very little effort or skill with a plan. Fit the router with the attachment by substituting the router sole plate with scrap mahogany and some 1/16 aluminum as a guide plate per the picture. The guide plate is positioned to where the bit is just a hair above the fair edge used to guide the router. The plank to be trimmed is attached to the bottom about 3/16 away from the fair edge using sheet rock screws. Some 3/16 sub-planking plywood scrap make perfect spacers. As the router makes its pass, the router bit eliminates all of the material that doesnt belong leaving a perfectly matched edge. The newly trimmed plank can now be repositioned next to the adjacent plank using a 1/16 scrap plywood spacer. The board should now be temporarily drawn down to the frame with 1 sheet rock screws. In the forward section, a greater number of screws will be necessary to provide a flush fit to allow a true fit for the next plank. In all of this effort, especially in the forward section, it is a good idea to have a buddy help hold the plank in position while you screw things in place. The alternative is to be clever with clamps, braces, and wedges. In some cases, it would be best to steam the planks before attempting to bend them and screw them into position with sheet rock screws.
 Picture #2 shows the router midway through its path. When making the pass with the router, be sure to move the router in the proper direction. Moving in the wrong direction will encourage the router bit to pull away from the guide ruining the edge being trimmed. Always cause the cutting edge of the router bit to force the router against the guide edge. Moving the router to the right would be the correct direction as shown in the picture above. Notice that the guide edge is at the back of the seam.
With that knowledge, it is time to cut planks starting with the forward garboard plank, either port or starboard. Lets consider that we have the bottom frame rebuilt and the plywood nailed down, bedded in a generous bead of 3M 5200. Lay out the new wood on the workbench and clamp the old plank to it. Using a black felt tip marker, trace the outline of the old plank. For planks that are beat up on the edges or have missing parts, you will have to draw between the missing points with a straight edge. Remove the old plank from the new stock and cut the keel side of the plank to the line with a band saw or saber saw. Next, follow the directions given above for trimming the edge of the plank with the router, and presto, you have matched edges.
Now, what about the other side of the plank? It will require a bit of your woodworking skill. Cut the plank to final rough size and trim the final shape to the line drawn with a plane. A great tool to use here is an edge plane that is available at the local woodworking stores such as Rockler or Woodcraft. This tool planes the edge of the plank at a perfect 90 degree angle to the surface while making a fair straight line. It is well worth the $125. Once the edge is fair and straight, it is ready to use as the guide for trimming the next plank for a perfect fit. The next plank to fit is the companion aft garboard plank. With that finished, fit the fore and aft garboard planks on the other side. Alternate back and forth in fitting the planks to equalize the stress the planks will place on the hull frame.
Due to some new dimensions the hull took on with the new frames, keel, and chines, you may have to adjust plank width to some amount. Planning ahead by laying out all of the planks on the bottom will give you a good idea of how much adjusting of size will be necessary. Keep an eye on the plank outer edge to assure that it is straight fore to aft. Dont be confused by the fact that the planks are wider in front than they are in back. This is a product of geometry. Looking straight down on the hull will reveal a straight line, but the greater V shape at the bow is going to create a longer line in dimension from side to side. The last cut at the chine on the chine plank should be trimmed to fit by hand. Place spacers between it and the previous plank and draw a line on the bottom of the plank using the outside of the chine as the marking template. Redraw the line to the inside of the first line to mark the outside edge that would allow the plank to lay in the rabbet, then cut to fit leaving a 1/16 gap.
When you have fit every board, drill all of the screw holes to the depth required for each area. Typically, frames screws are 2, chine and keel screws are 1 ¼, and transom base screws are 1 ½. Check each seam for an even 1/16 gap. Clean up any problems with your edge plane and coarse sandpaper on a large radius sanding block for the forward inside curves next to the chine.
With the screw holes done, number all of the planks as they lay. Number the port forward garboard plank P1F. Number the companion port aft garboard plank P1A. The next planks out are P2F and P2A., etc. The other side is the same except use S for starboard. Now that you know exactly where every plank belongs, remove all of them and coat the backside, ends, and edges with a coat of clear penetrating epoxy sealer, or CPES. Also give the plywood sub-planking a coat of the same and let it dry for a couple of days. Then, using 3M 5200, spread a thin layer of this amazingly sticky stuff on both the bottom of the board and the plywood in the area where the board will be with a 6 spackle blade How much is the right amount of 5200? If you scrape it off to the wood, you took off too much. If it lies in globs, you left on too much. About 1/32 on both surfaces is about right. Screwing the plank in place will cause some of the 5200 to ooze out. Wipe off the excess. Did I remind you to wear old clothes? This stuff will appear on everything around you if you dont work clean by
wiping your hands frequently with paper towels and naphtha. Continue bedding the new planks in 5200 and continue driving home all 1500+ screws. Dont weaken. It is a long process, but it can be done. The whole process of cutting, fitting, and installing the bottom planks will take 30 – 40 hours of labor.
As part of the installation of the new planks on a Chris Craft, you need to install the 5/8 x 1 intermediate ribs between the frames. The biggest problem in installing these on the inside of the hull is centering them on the screw holes drilled through the hull bottom while you are working blind from outside of the boat. You need a gadget to make this process go easier.
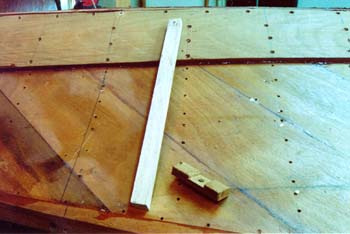 Take a look at picture #3 You see an intermediate rib and a block of wood with a notch and screw protruding through the block in the middle of the notch that will work magic for you. Now here is the process. Mark on the rib where the inner most screw would be for holding the intermediate rib and drill the anchor hole. Insert a screw of the proper size through the plank at the inner most hole for that rib. Lay a bead of 5200 on the rib and insert it through the open area where the topside chine plank was. Put a finger on the screw to hold it in place while rubbing the rib on the screw searching for the hole. Once located, grab the screw gun and drive it home. The other end of the rib is still loose. Insert the screw in the notched block into the next to the outer most screw hole of the intermediate rib from the underside of the bottom. Now, place and hold the rib in the notch and drill an anchor hole through the outermost hole into the rib and put in a temporary short screw. You will replace it with the correct screw later when you install the plank over that area. So simple! It is really a no-brainer after you think about it for a while.
This has been a fairly general description of the process. With some thought about what is taking place at the various stages of the process, all should go well. Some final words of advice are: Measure it twice; cut it once. Use a straight edge to draw straight lines. Dont cut past the line. Keep your tools sharp. With this and some
common sense applied, the new bottom should come out just fine. Got questions? Give me a call at 952-432-4345.