by Dan Nelson, Nelson Boatworks, Mound, MN
Bottom Replacement
by Dan Nelson
Nelson Boatworks, Mound, MN
The first thing to remember when owning a wood boat is: The fish don’t care if you have fifteen coats of varnish on your boat when it’s lying on the bottom.
It is my opinion that too many people ignore the most important part of a wood boat, and that is the bottom. If you own a boat with an original bottom and it still floats, youre lucky. Don’t push your luck! A typical Chris Craft bottom was designed to last approximately six years.
I am going to focus my attention on installing a “West System” Bottom. Don’t get me wrong, there is nothing wrong with a traditional or “modified” traditional bottom; it depends on how traditional you want to keep your boat and how you use it. If you are going to keep your boat on a trailer and use it only on weekends, I recommend a “West’ bottom. If you decide to stay with an original bottom, you should plan on keeping your boat in the water for the season. An original bottom is not meant to be swelled up and dried out repeatedly in one season.
Flipping your boat over
 There are many different ways to get your boat upside down. If you have a smaller boat, (under 18 feet) you can do it with a lot of your friends. Although you may accomplish this task with six people, more is better. For an eighteen foot boat, I recommend eight. If your boat is bigger, you should turn it in slings. No matter how the job is done, the first thing to do is properly brace the boat. Using 2×4’s, fasten them across the boat from frame to frame and fasten just below the sheer plank. I use carriage bolts for all fastening. In addition to the cross braces, I also fasten a 2×4 from the stringer to the cross brace. The amount of bracing required will vary depending on the size of boat, and whether it’s a utility or a runabout. A utility will require more bracing due to the open design.
Removing Existing Bottom
After you have successfully flipped your boat and have it properly supported, youre ready to remove the existing bottom. If you are going to put a traditional bottom back on, you will want to be more careful removing the existing bottom planks so you can use them for patterns. Start by taking a sharp scraper down the frame line and remove enough paint to find the screw holes. Next, using a large plug cutter (1/2″ diameter,) drill out around all screws. You should have several plug cutters on hand because you will inevitably hit a screw and wreck the cutter. After all screws have been drilled out, remove excess wood around the screw head and remove. If the screws do not come out easily with a screwdriver, use a vise grip. When you have removed all fasteners, remove the planks. Note, if you are going to use them for patterns, number them before they are removed. Now remove the inner layer. The easy part is now done.
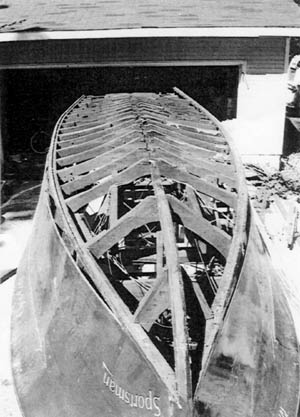
Inspecting Framework
This is the most important part of a bottom restoration. The work you do here will determine how long your new bottom will last. The bottom you put on is only as good as the framing that supports it. Before I start talking about specific framing , I want to talk a little about what were looking for.
1. Signs of the boat spreading apart. A tell-tale sign is when the intermediate frames are no longer tight to the chines.
2. Broken or cracked frames. If you find a frame that is damaged, mark it for replacement, but also look to see why; you may notice a pattern.
3. Rot. With a sharp awl, poke around for soft spots and mark for replacement.
4. Oil soaked frames. If you clean off all oil from a frame with a strong solvent and come back the next morning to find oil beading up again, mark it for replacement.
 Now you may have noticed a theme in the preceding steps: Replacement. if you have any frame that is at all questionable, I recommend replacing, in lieu of repairing. By the time you glue a frame back together or dutch in a new piece, youre going to find it was faster to remove it and replace it. I also recommend that no matter what you do, every frame should be taken apart, bedded together with either “Sikaflex or “3M 5200.” Granted, it is going to take a lot more time to disassemble every frame, but by sealing up all these joints, you guarantee a bottom that will last many lifetimes.
Step 1: Remove chines and keel.
Clean all members of dirt and oil. Inspect for rot and excessive oil soak. If either of these members need to be replaced, set them aside for now until you have completed repairing all frames.
Step 2: Disassembling bottom frames.
The first thing to do is to make sure the bottom is still fair. Generally, with just a sight inspection, you will be able to see any problem areas. Next, I start with refastening all intermediate frames (these are the ones that only go to the chines.) In most cases, they will be fastened at the chines with a big screw and at the stringers with either a screw or a bolt that runs all the way through the stringers. After you have removed the frame, remove all the screws at the frame tie. After the pieces have been inspected for decay and found to be okay, apply a layer of caulk (Sika or 5200) to both surfaces and spread out evenly. Refasten pieces using new screws, and reinstall. Note: Before fastening back down to stingers, apply a layer of caulk to these surfaces also. Continue this procedure for all intermediate frames (one at a time.) Repeat this same procedure for the frames that fasten to the side frames at the knees. This is also the time you should inspect the side frames. If they are bad or in need of minor repair, now is the time to do it, because once you bed that knee back down with 5200, it is not going to come back apart in one piece.
Step 3:
After all bottom frames have been refastened and all bad frames replaced, all the new frames should be sealed (all surfaces) with “Smith Systems” penetrating sealer. After this has been allowed to dry, prime all new frames with Red Lead Primer. Do not prime the bottom surface of the frames where they will come in contact with the bottom. This is much easier to do when the bottom is off. It allows you to get into every nook and cranny.
Step 4: Reinstall chines and keel.
If either of these need to be replaced, I have found it easier to laminate them together instead of making them out of a solid piece. These pieces should also be sealed and primed in the same manner as the frames.
Step 5: Now it’s time to start putting the new bottom on. First lets talk about plywood. On a typical runabout, 20 feet or under, I use three layers of 6mm “Okoume” plywood, made by “Shelmarine.” This material is made up of five plies of all the same thickness. Do not use so-called marine plywood sold at the local lumber yard; it is not made for this application. To figure out how much material you will need, take the length of your boat, divide by 8 and multiply by 6. (Example: On a 16 foot boat, you would take 16, divide by 8 = 2, multiply by 6 = 12.) You will need 12 sheets of plywood. Note: it’s going to be pretty much the same quantity for a 17 or 18 foot boat as well.
You are going to need a third of your plywood for each layer. Start by laying out the sheets you’ll need for the first layer and generously roll on a layer of “West” epoxy on each sheet. After they have dried overnight, the sheets should first be washed off with soap and water with a Scotch Brite pad. This will remove the layer of film that forms when West cures.
Next, these sheets should be sanded with 80-grit sandpaper to scuff them up. This side is going to be on the inside of the boat, and it’s a lot easier to do this work now rather than try to work around all those frames later. I put the first layer on in partial sheets with the grain running fore to aft. Your pieces generally shouldn’t be any wider than two to three frame-widths. Anything bigger than this will be hard to bend into place. Once you get up to the front of the boat, you may wish to switch over to applying it diagonally. Fit all your pieces before permanently fastening; all joints must end on a frame.
To fasten the first layer, apply a generous coat of 5200 to the frames, chines, and keel. You want just enough on so that it squishes out slightly when fastened. Now lay the plywood down onto the frames and fasten down using 14 gauge 1 1/4″ silicon bronze ring shank nails. The second and third layers are applied by ripping the plywood into 6″ widths and applying it diagonally to the keel at a 45 degree angle.
Start by cutting an angle to one end of a strip. Hold this angle tight to the chine — start in about the middle of the boat — and mark the angle at the keel. Cut this angle, then temporarily tack down this piece using finishing nails. Make sure you mark the frame locations as you go. Continue this process until you have fit the entire layer. Tack each piece down as you go and number them in sequence after you have completed the fit. Note: you may have to rip down the width of your strips when you get towards the bow of the boat. This will make it easier to bend them into place.
After each layer has been been dry-fit, remove all the pieces, making sure you have marked a starting board point. Now the job is going to get messy. Roll out a layer of West onto 4 or 5 pieces at a time, and to the layer already applied on the boat. Next, mix up a batch of West, adding 403 additive until you have the consistency of mayonnaise. Apply the thickened epoxy onto the layer of the boat until the area youre working on is covered. Now start fastening down the strips again using ring shank nails. Note: you want enough epoxy to squish out so all edges are also covered with epoxy.
After you have applied 5 or so strips, you may notice some of the joints between the strips are not flush. One way you can get these down is by using short staples. You don’t want them to go all the way through the preceding layer. If you use staples, they should be Monel, which is an alloy that won’t rust. The other way to do it is with short pan head self-tapping screws. If you choose this option, the screws will have to be removed after the epoxy has cured, but they do suck up better than staples. After you have finished this, clean up the area youre working on and continue the process until the entire layer is on. The third layer is then put on in the same manner, but with the strips running opposite of the layer before.
Step 6:
You now have all three layers of plywood on your boat and are by now thinking youre wearing more epoxy than is on the boat. Well, were not done with it yet! You now want to roll on at least five additional coats of epoxy over the bottom. Start by applying one or two coats and let it dry. Look for imperfections in the “fairness” of the bottom (high and low spots.) Mark these areas. Next, scuff the bottom again using 80-grit paper. Then mix up a small batch of epoxy and add in 410 fairing compound. Mix it to a thick enough consistency so it won’t sag. Now with a drywall trowel, 6″ putty knife, or combination of both, spread the mixture over the imperfections. It’s a lot like mudding drywall — don’t overwork it, but remember the bumpier it is, the more sanding you will have to do. After you have sanded these areas out and are satisfied with it, apply another four coats of West. This time, add in 422 Barrier coat additive. This will improve the moisture resistance. If you have the time, apply these last coats when you have a full day to do it. If you wait until one coat has firmly tacked off, you can put another coat over it without sanding. If it does dry completely between coats it must be sanded.
Step 7:
You are now done with the West. Scuff the final layer and apply two coats of Red Lead primer or any other primer compatible to the bottom paint. Let the primer dry. Scuff and apply two coats of bottom paint. You have now completed your bottom. Throw away the clothes you’ve been wearing — West doesn’t wash out!
Summary:
I’ve gone through this procedure pretty quickly. This is just meant as a guide to help you. The two most important things to remember are (1) Prep. Remember, you do not want to have to do this again, but if you try to take shortcuts in preparing the frames, you will. “If in doubt, throw it out. (2) One thing at a time. Don’t tear everything apart and then scratch your head trying to figure out what to do. Thats all I have, Good Luck!
Suggested Suppliers:
Jamestown Dist. West Systems, Fasteners, 3M 5200
800-423-0030
Harbor Sales: Shell marine plywood
800-345-0107
Sandusky Paint: Red Lead Primer
419-626-2461
Smith Systems: Epoxy penetrating sealer
510-237-6842