…That Is The Question
by Sherwood Heggen
Have you ever seen a varnished wooden boat that doesnt have a flaw in the varnish; not as much as a dust speck? Well, it is possible you are looking at a varnish job that was buffed out. The practice is a bit controversial. To buff the varnish, abrasives are used to level the surface and eliminate dust, moth wings, and bug legs. Some say breaking the surface of the varnish by using an abrasive causes it to age more quickly than if it were left alone. Others claim it doesnt matter that much, if at all.
During my research of this topic, I learned that the idea of buffing the varnish is not recommended. That isnt to say it cant be done, otherwise why would I be writing about it? The topic for this offering of Gadgets and Kinks is buffing the final coat of varnish. Lets see what the experts say about it.
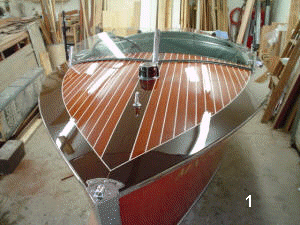
The Epifanes rep I contacted made two points regarding the practice: the varnish does not come up as glossy as an unbuffed finish, and, the abrasives in the buffing process leave microscopic scratches in the varnish, shortening the longevity of the finish. Those are two valid points but can the downside be tolerated for what appears to be a better looking finish? The point regarding less gloss wasnt recognized in the example used in my buffing effort and the longevity is relative. In speaking with two professional restorers regarding buffing varnish, both had similar conclusions; the finish looks great but may not last quite as long. If the boats finish is protected from the elements, it should still see a reasonably long life. So,  make your choice. Picture #1 is an example of a buffed boat.
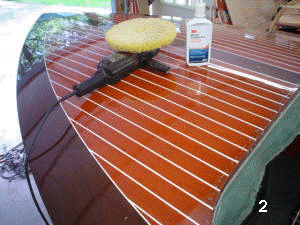
Lets throw caution to the wind and buff the finish. You might want to try it at least once. If you dont like the affect it has on the varnish long term, dont buff it out the next time you varnish your boat. To do the job, you will need an electric polisher to do the polishing. The polisher is a hand held motor with a seven or eight inch diameter polishing wheel at 90 degrees to the motor. (See picture #2.) On the polisher, a polishing pad is installed. You will also need wet or dry sandpaper of 1500 and 2000 grit, and 3M Finesse-It II finishing material to do the polishing work under the swirling pad. These supplies can be purchased at most auto or auto paint supply stores. Be advised that this process is a lot of work and you may want to consider doing only the decks and transom. Boat sides are seldom recognized for any flaws when being admired from the dock. Lets get started.
 It is important to understand that varnish should be well cured before buffing is attempted. Typically it takes a couple of weeks for the final coat to cure. It is important to have a hard surface to work. Also, if the deck seams are to be painted, that should be done before buffing. It will cause the painted seam appear to be part of the finish with no ragged edge to catch cleaning rags on when the buffing is completed.
Now, with a supply of water, clean rags, and 1500 wet or dry sandpaper, begin sanding the deck. Wrap a half sheet of sandpaper around a Scotch-brite or a small cloth folded into a pad about three by four inches in size to distribute the sanding pressure. Sand a two by two foot section at a time keeping the area sloppy wet to avoid debris build-up on the paper. After sanding the section, wipe it down with a dry rag and check your progress. You should see a semi-gloss finish instead of shine and dust. If the surface doesnt have a consistent semigloss finish, continue sanding as necessary until it does and then move onto the next section. When you are finished sanding with 1500 grit paper, repeat the process with 2000 wet or dry sandpaper. When that is done, it is time to buff and polish with the electric polisher. Squirt a couple of lines of 3M Finesse-It II finishing material on the area that you are going to work. Smear the buffing pad around in the finishing material and then start the polisher at its lowest speed. Again, keep the work area confined to a two by two foot area at first. Keep the work area coated with finishing material. As the polishing progresses, you will see the shine start coming up. Start working a bigger area as the shine comes up and the finishing material dries under the friction of the buffing wheel. If the shine doesnt come, apply some more finishing material and continue buffing. Soon you will be making large sweeping passes with the polisher as you begin to recognize a glossy shine. Dont let the buffer run in one spot too long or heat could build up causing damage to the varnish. When passing the buffing wheel over an edge, such as, around the cockpit or the sheer line, be sure the buffing wheel rotates over the edge, not into it. If the wheel runs into the edge, the material in the buffer will catch on the edge and there will be buffer wheel lint all over the place. Try it once and you will know what I mean.
Once the entire boat is buffed, you will have to clean up residue from the process. A wipe down with a damp Turkish towel, followed by a dry towel, will reveal a beautiful glossy finish.
Basically, that is all there is to it. Good luck with your attempt at shining up the old tub.
This boat restoration past time involves a lot of experimenting with methods, tools, and ideas we havent tried before. I urge you to be inquisitive and try new things and pass the stories of successes and failures on to others so they too can learn. I am interested to hear what you might have experienced so that I might pass the information on to others. Or, if you have any questions regarding restoration, feel free to contact me at Heggensj@Centurytel.net or 715-294-2415. Either I or a qualified contact will provide an answer to your question or concern. Be assured, we care to make sure you restore it rather destroy it.
Now, go work on your boat. Go on. Get to it!! Time is wasting away!! Spring is coming!! Really! Turn the TV off and go work on the boat!!

