(or Give Your Old Lady a Face Lift)
By Sherwood Heggen
What is the first thing people see when they look at your boat at the dock. Of course, the decks. By what, then, will they judge the overall condition of your boat. Again, the deck. What are we going to talk about in this article. Uh-huh. New decks for the boat.
Here we will be referring to the decks of runabouts and utilities or almost any water craft that has planks for decks rather than plywood covered by canvas or Nautolex.
Now someone will say that all that is necessary to put on new decks is to cut planks to the same width and screw em down. Well, sort of. It isnt terribly difficult to do, but dont rush in to it blindly.
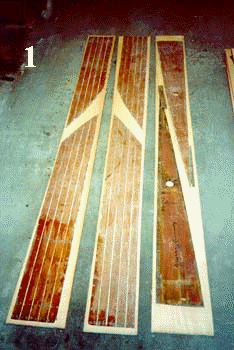 We are going to determine first why and if you should replace the planks. It is possible the decks on your boat have been sanded a couple of three times over the past fifty plus years and are rather thin. Thin can be recognized by the deck seams that have a depth of next to nothing and bungs that are wafer thin. Or, the decks may have full thickness, but badly weathered from sitting outside unprotected for years. It may be possible to sand to good wood but what you may not see is rot eating up the bottom of the planks and the battens to which they are fastened. That may be
recognized by cupped planks or discolored wood at butt joints or seams. You will need to pull the deck to repair the damage but once you are that far, you might as well replace them with new wood. Other concerns in the form of cracks at butt joints, gouges, and breakage may be bigger
problems to fix than what would be worth your effort. If some or all of the negatives mentioned above exist, the decision should lean toward new decks. The first order of business is to determine what wood you will need.
Measure the length and width of the planks you will be replacing. Choosing the wood is somewhat of a mind boggling experience because the lumber cant be purchased as you would 2×4s. The wood comes in the lengths that it comes in – sometimes 10 feet, sometimes 12, next time 14 feet. Occasionally you may get lucky and find the actual lengths that make up a combination of deck planks needed without any appreciable waste. Also, be on the lookout for cracks that can run a considerable distance into the plank. Even when you cant see the crack anymore, it continues a ways from there, so be forewarned. There is no sense in building crack into the deck. That is what we are trying to get rid of. You may want to cut off the waste around the crack to turn into bungs or other parts that require thicker pieces of wood before you send it out to resaw it. Economize where you can. Other times you must accept the waste factor to get the plank that you want.
 Locally, you can run up to Youngblood Lumber in northeast Minneapolis and sort through their stock of Philippine, African, or Honduras. (An solicited plug here for Youngblood. I love Youngblood Lumber. It has all of the wood I want. The people there are always down to earth and friendly and they let you sort through the whole stack of lumber to get the one piece you want. They will even get out the fork truck and move things around for you so that you can get at the stack you want to go through. When you get done sorting through the lumber, be sure you leave the pile neater than when you found it. They would appreciate that.)
Your sorting skills to choose the right lumber becomes very important here because the wood you place on the deck will be the first thing most people look at. Study how the factory deck plank wood appears on your boat. It typically has nice straight grain. These planks are quarter-sawn where the grain in the wood is the edge of the annular rings of the tree. Looking at the end of the plank, you will see the grain running 90 degrees, or nearly so, to the surface of the plank. Steer away from slab cut planks which produces cathedral arches in the grain. This grain pattern doesnt give a good impression for a deck. Another quality to look for in the wood is its weight and color. Compare planks and you will see some have a pale appearance and/or may be very light in weight. Pick wood that is as dark in color as possible and has good density. In handling different planks you will quickly acquire a point of reference to compare good and bad planks.
An attractive deck has another quality that must be built in by the restorer. It is book-matched planks. Book-matching is laying planks on port and starboard side of the deck that have a mirror image of each other. It is accomplished by selecting lumber stock of sufficient thickness to be able to saw the plank in two length-wise to lay open the plank for matched grain. This extra effort method brings an eye-appealing symmetry to the decks and covering boards that is professional looking. Stock of at least 5/4 thickness is required to obtain two planks 3/8th of an inch thick and 6/4 stock for up to 1/2 thick due to material wasted by the band saw blade kerf and drift plus planing.
 Determine the amount of wood by measuring the lengths of the planks being replaced. With all the planks chosen, you will need to re-saw and plane them to the correct thickness. Again locally, both Siwek Lumber and Stewart Lumber in northeast Minneapolis will resaw to order. Youngblood planes the wood for a very reasonable price and they will saw a straight edge on one side of the planks if you request it. The straight edge saves a lot of time when it come time to rip the deck planks to width. While they are doing that service for you, get busy and remove the deck planks from the boat, if you havent already.
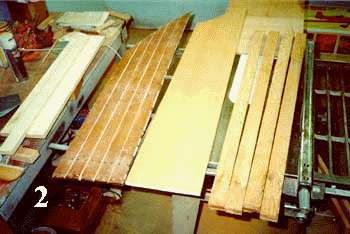
When you get your planks home, you will want to begin laying out the old planks on the new lumber. Hopefully you kept some notes on which planks were chosen for the various deck planks. Arrange the new lumber on the floor side by side making sure the book-matched planks are in correct relation to each other. The picture below shows how the deck planks are laid out on book-matched lumber.
You will notice that the long triangle shaped parts are being cut from the same board. These are planks that lay on either side of the hatch. While they are not truly book-matched, they are cut from the same plank with a very consistent grain pattern. Any irregularities that exist are not going to be easily seen by any observer. Even true book-matched boards will not be a mirror image because of the angle of the grain through the plank and material removed. The planks on the deck, however, are so close to each other that unmatched planks are more easily noticed.
After you have determined what deck planks fit where on the new lumber, label their location with chalk. Lets say the #1 and #2 forward deck planks fit on the new lumber as in the above picture. Mark their location with 1PF and 2PF for the port side and 1SF and 2SF for the starboard side. The #1 plank would be the one closest to the center of the deck. The side of the plank you mark is understood from then on as the top side of the plank.
Lets move to the table saw and make the lumber into deck planks. The following will describe how to saw the planks to the proper width and then saw the seams to the correct spacing.
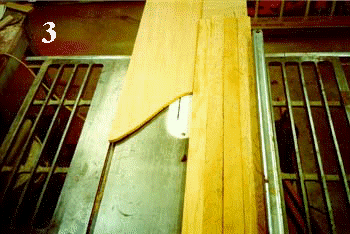
 First determine the width of the plank with a ruler making sure you arent including in the measurement old caulking, varnish chunks, and dirt. Then measure the distance from one side of a seam to the same side of the next seam. In the example shown, the measurement was 1 13/16th of an inch. With five spaces between seams on the plank, the total of the measurement is 9 1/16th inches which should be exactly the actual width of the plank. To prepare for sawing the seams on the table saw, you will want to use the following gadget. In this picture you see strips of plywood which were ripped on the table saw to the width of the seam spacing measured above. They are used as spacers to move the plank a seam spacing width away from the fence on each successive cut. After you saw a seam on the plank, add a strip before you make another pass for the next seam. This eliminates having to reposition the fence each time you saw another seam, guaranteeing consistency in the spacing of the seams.
You are almost ready to start sawing except for one thing – the saw blade. It should be about a 40 tooth finish blade with a kerf no greater than 3/32nd of an inch which is the width of the actual factory seam in most cases.
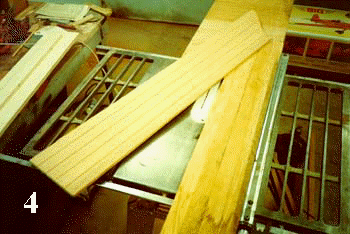
Begin by sawing the plank to the exact width required. With that done, move the fence on the table saw in by exactly one saw kerf width. Adjust the cutting depth of the blade to about one-third of the thickness of the plank. Before you make that first pass to saw the edge seam, be sure you will be sawing the seam on the correct side of the plank. Look at the original plank. The edge that butts up to the king plank will have the first seam at the very edge. Mark that side on the plank and orient the plank to have the saw cut that edge seam first. Now, pass the plank through and you will have cut the first seam. To saw the next seam, place the first spacer next to the fence and pass the plank through a second time. Continue adding spacers with each successive pass until all seams are cut as pictured below.
When sawing the seams, it is wise to use a feather board to maintain pressure on the plank against the fence and spacers. This will assure the plank doesnt drift back and forth and a clean, straight seam will result.
There are the basics. Certainly, use all of the safety equipment available to you and think through what you will be doing to be sure the end result is the expected result. Doing so you will have some really good looking deck planks.
What about the covering boards? At this point, match your lumber and cut the parts out oversize except for the inside curve on the forward covering boards. Trace the inside curve using the old covering board as a pattern and cut the curve carefully. Sand the curve fair by sanding it with a long, flexible sanding board made from a thin 1-1/2 x 12 piece of plywood. Screw a handle in the middle and attach adhesive back sandpaper to it and sand to the line. If you dont have adhesive back paper, there is a sanding disk spray adhesive available for attaching dry-back paper.
Go for it and do good work. Each part made and step taken needs to be done with the best of your skills at hand. It is amazing how easy it is to see the detail that you gave up on stick out like a sore thumb. Your basic reward for a job well done will be pride in your finished product.
Next time we will fitting the planks and covering boards to get that perfect fit. Until then, dont destroy it; restore it. Or, a least repair it.