…or Necessity is the Mother of Invention
by Sherwood Heggen
No workshop is complete without tools. To accomplish our tasks we have hammers, saws, pliers, wrenches, drills, etc, that can be conveniently purchased. One would think we could buy every imaginable tool. Yet, the process of restoring wooden boats often demands a tool that no one sells. It is a tool that has to be designed on the spot to fill the need. Like a monkey using a stick to extract ants from the ant hill for food, you feel a basic instinct come alive when a need arises for an unusual tool. Often, it can be made of scraps of lumber right in your own workshop. Below are descriptions of a couple of tools that came into use by imagination in my shop.
A perplexing problem when installing new deck boards is trying to cut the forward ends of the boards to fit flush to the inside of the covering board screwed to the deck. Another example is fitting bottom planks inside the chine rabbet. How would one know where to draw the cutting line when that line is hidden by the boards? Check out the tool in the picture below that makes scribing the correct line almost too easy.
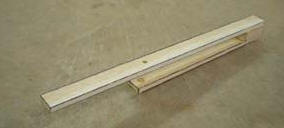 It is simply two thin strips of wood joined with a spacer a bit thicker than the plank. There is a short dowel through the bottom strip and a hole big enough for a ball point pen to protrude through in the top strip without a lot of slop. The hole is located directly above the dowel edge that is on the side of the tool where the two strips are joined. With the deck planks cut a little long on the forward end and temporarily fastened at the aft end, the tool is placed over the edge of the planks. The dowel, protruding through the bottom strip, is held against the inside edge of the covering board and the top strip is held flush against the deck boards. A ball point pen is inserted though the hole in the top strip. Then, move the tool along the length of the covering board while applying pressure to the pen to mark a line on the plank. Keep the tool perpendicular to curve of the covering board as you make the cutting line. Carefully done, the line will be quite accurate. Make your cut according to the line, do a final fit, and screw the boards into place.
 At left is a picture of an air file, generally used in auto body work. It also does a very good job of fairing the hull of a boat. Its downfall is the sanding base is too narrow for fairing compared to a broadboard sander operated by hand. If one were to combine an airfile and a broadboard sander, it would look like what you see here..
The narrow airfile base has been replaced with 1/4 inch tempered hardboard which is thick enough to allow countersinking the mounting screws. The one shown is as long as the original base, but is about four and one-half inches wide. Since the board is too stiff and wide to lay flush against a concave surface such as the forward topsides, it was made more flexible by sawing lengthwise grooves about one-eighth inch apart and a little over half the thickness of the board on the topside. Now the board will conform with moderate pressure against a concave surface of the hull. More groves can be cut across the board to give it more flex in the opposite direction to conform to a convex surface. Hand sanders for final fairing of the hull can be made in a similar fashion. Saw groves on this one too and it will flex and conform nicely to the hull to take off all of the high spots. Screw on a couple of knobs or handles made of scrap wood, apply your stick on sandpaper and you have a fantastic fairing board for cheap.
Have you ever had to deal with a screw that has lost its hold or is broken making it impossible to remove with a screwdriver? It just stays hunkered down in the hole refusing to come out. You could try to pry it out with a screwdriver, but you cant afford to damage the wood around. It is time to make another tool. This one is so simple it is hard to think of. Although it might not always work on a real stubborn screw, it is worth a try. Make a small stick from scrap mahogany and whittle one end down to resemble a slot screwdriver, making the end just big enough for a snug fit in the screw slot. Point the end a bit if you are removing a R&P screw. Trial fit the end in the screw slot to be sure it is a snug fit. Be sure the screw head is not hung up on wood on the side of the hole. If so, trim the wood away with a sharp X-Acto blade. Put a drop or two of super glue on the tip of the stick and press the tip into the screw head. Let it be for a bit to be sure the glue has kicked off , then slowly turn counter-clockwise while pulling gently. Most likely, the screw will come right out. The feeling of victory while looking at that stubborn little screw on the stick
is hard to explain. Oh wait! The hungry monkey pulling a stick full of ants out of the ant hill comes to mind.
This is just a sample of the tools that can be made to meet a need. I have a drawer full of wedges, spacers, clamp accessories to give the clamp better footing or create a deeper throat, and devices that allow drawing of an accurately placed line. What tool do you need that your imagination can design? Dont let the lack of a tool complicate the process of restoration. Outwit the problem with your imagination, some scrap wood, and some time.
Hopefully, the non-boating season is allowing you plenty of time to make progress on your restoration project. Trying to get it done right can often be a challenge, especially if you havent any previous experience. If you get hung up on how to proceed, dont be afraid to ask how to do it. Send me an e-mail at Heggensj@Centurytel.net or call me at 715-294-2415. You will be provided a useable answer by myself or other experienced restorer.
Please understand we would rather see you restore it than destroy it.
Hang in there. Keep the vision. Beauty comes slowly with sweat and effort, so, dont be afraid to put out a lot of it. It will be worth it on the lake when someone pulls up along side and says, Nice Boat!