(or Beauty Starts from Within)
By Sherwood Heggen
In the last offering of Gadgets and Kinks, we learned how to make deck planks using a table saw and spacers to index the deck seams. Since then, you have probably had time to pull all of the deck boards from your hull exposing the deck frame below. Now, you are waiting like a Labrador Retriever ready for the hunt to hear more about how to professionally set these planks in place. Well, get back into the kennel. We got some things to do before any planks can be put in place.
When you pulled all the planks did you take a close look at the framework? Did it all look solid or were there little signs of trouble peaking out at you? What would those signs be? At first, everything may seem fine. While mounted on the boat, framework can give the appearance of being solid. Trouble spots may not be in plain sight and disassembly is required to get at the heart of the problems.
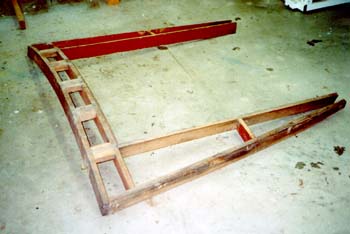
Take a look at the picture below of an aft deck frame sub-assembly that surrounds the engine hatch. The framework is straight, the wood seems hard, and there is still paint on the wood. Closer inspection shows where water migrated through seams and edges. There is discoloration and a checked appearance in those areas. Digging in deeper with the use of an ice pick or penknife, rot becomes apparent. Bad wood will be easy to penetrate and break away. Take a close look at the next picture.
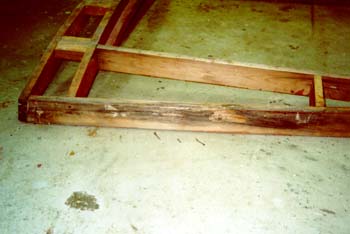
The classic rotten board is very evident but there is another sign of trouble. Where there is a screw holding two solid parts together, the screw hole looks black and dirty. Attempting to remove the dirty screw quickly reveals that the screw is not going to budge and the screw head has a very hard, gritty feel to the blade of the screw driver. Do you know what that means? Can you say steel screws? Yes, the framework of early boats was assembled with steel nails and screws. Well, why not? They were cheaper than brass and the boat wasnt supposed to be serviceable for more than ten years anyway. But now four to six decades later, we got a problem.
 Look closely at the picture and you will see three pointy items lying beside the frame. These are 1½ steel screws that have deteriorated to less than an inch long in some cases. What do you think there holding power is? Yeah, next to nothing. The following picture is evidence of that.
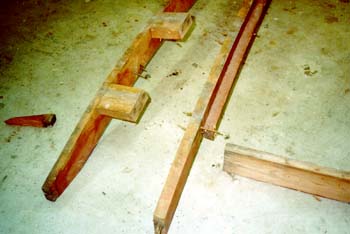
 The framework shown was tapped apart with light blows of a hammer. In so doing, the wood revealed that its life was gone by breaking from the blows. The parts separated easily because the rusting screws had lost their threads and destroyed the wood around the threads that held things in place. Over time, the screw would disappear completely.
 Okay, now imagine that you screwed on brand new planks over this mess. Sure the planks would hold things together for a bit, but the strength of the hull does not depend on the skin but also on the framework. It has to be solid.
So now what? You started out with a pretty good looking frame and now its is labeled as junk! Cmon, pull yourself together. It is not all that big a deal. Well get through this. If all else fails, there are professional restorers who can get you over this hump if you feel it is too big. Just be sure of one thing — dont give up and destroy it; enlist help if necessary and restore it. It will be worth it. Just be sure you choose your restorer
carefully. You dont want this problem to turn into a financial nightmare. Anything that is built can be rebuilt.
First, take a lot of pictures. Then, start taking things apart being careful to mark locations of parts, take measurements where you think it is necessary, and even make simple drawing of how the problem area is
assembled. Then, make your trip to a lumber yard with your wood list in hand to get replacement wood. You may find that there are parts that seem okay to use, but why take a chance after you are this far? New wood will outlast old wood and the time spent in making a new part will probably take less time than trying to fix the old part.
There may be wood parts that are solid and useable, so certainly use them if that is the case. There may be screw holes that need plugging, however, to allow solid foothold for the new silicon bronze screw. To plug a hole, simply drill a 3/8 hole to the depth of the screw hole and then fill it with 3/8 bungs of like kind wood, gluing them in place with epoxy or carpenters glue. Chisel them off flush to the surface after the glue is set and your wood is as good as new.
Making new parts can be done with a good saber saw and a stationary disc sander to sand right to the line you drew when you traced the old part onto the new wood. Try using a fine point felt tip pen to mark the line. It shows up much better than a pencil line. Another proven method is to rough cut your part to about 1/16 over size of the original part. Then, clamp the new stock and the original part together and trim it to size with a laminate trimmer on your router. This works great if you have an original part with a smooth even surface for the roller to follow. Any faults in the pattern will be duplicated in the new part.
From here on you are kinda on your own according to your project. As always you are welcome to give me a call. Good luck and build straight.