(or Are You Man Enough to Make the Cut?)
by Sherwood Heggen
To the amateur boat restorer, there are some very intimidating restoration tasks. To be sure, many are scared off by the fear of getting in too deep and therefore never trying. Or the task is far beyond their ability and unfortunately abandon the project and sometimes destroy, rather than restore, the boat. Now, you all have been admonished in past columns of Gadgets and Kinks to not get in over your head in a restoration project. The following is also advice that has been given. Know your abilities and then challenge yourself to use those abilities to greater advantage. This time we are going to tackle one of the most difficult-appearing tasks in restoring a boat. We are going to cut the rabbet in the keel and chines. Oh yes, we are!
 Let’s take a look at the concerns we are going to face when we do the rabbet. The question anonymously comes from the back of the audience, “What is a rabbet?”. The rabbet, in this case, is an “L” shaped groove in the edge of the keel or chine which receives the bottom planking. When you look at the rabbet on the keel, it appears that you could probably run the keel through a table saw and make quick work of cutting the rabbets. But look again. The rabbet angle rotates as you look from aft forward. No table saw is going to cut that correctly. Now take a look at the chines. They seem to be a bigger nightmare. The rabbet rotates nearly 90 degrees from stem to stern. Short of using a chisel and plane to do the whole rabbet by hand, how can this process be done accurately? The process is done in two steps. The first one is to fair the chines and keel to the level of the planked bottom with a plane. The second step is to cut rabbets with a router. You will fall over when you find out how easy this is! Here’s how.
Shape the chines and keel first. Assuming you have new chines and keel solidly screwed/bolted in place and the frames are fair, take a look at the shape of the bottom of your boat framework. Imagine that there are bottom planks in place. It is easy to see how extending the lines at the surface of the planking across the keel and chines would dictate their finished shape if all of the material above that line were removed. It stands to reason then that somehow the chines need to be accurately shaped. But with no bottom in place, how does one determine that finished shape? There is a simple process.
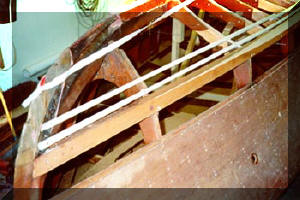
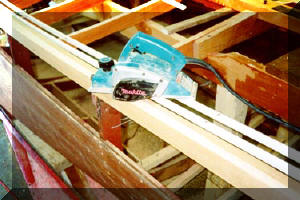
 The equipment you will need to fair the chines and keel is: an electric hand plane or a sharp jack plane, 8′ lengths of clear pine and some 1″ sheet rock screws and a drill motor with a screw bit. Cut the pine into strips that are as thick as the intended bottom thickness, i.e., 5/8″, and about ¾” wide. Screw two of these stand off strips to the bottom frames with the first one about ½” away from the inside of the chine. The other strip is screwed to the frames about 2″ away to the inside of the first. Attach these strips from stem to stern. The stand off strips take the place of the bottom planking without having to actually use an expensive piece of planking, plus they readily bend to the contour of the hull. Now, pass your plane over the strips at about a 45 degree angle to the chine with the rear sole of the plane on the strips and the blade cutting material off of the chine with each pass. The electric hand plane makes quick work of this step. A regular hand plane can do an equally good job but will require a lot of time and muscle.
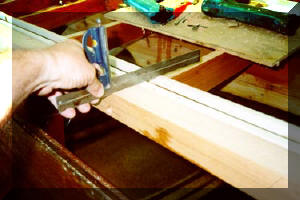
 Keep removing wood until the chines are flush with the stand off strips. Passing a straight edge over the stand off strips and chine is a quick check for flush. The keel is dealt with in the same way. On the typical runabout, the keel needs to be trimmed only at the forward end if the keel was planed to the thickness of the original keel.
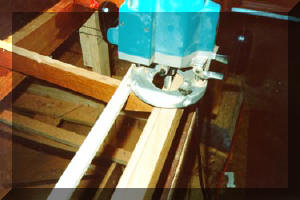
That brings us to the next step. The correctly shaped chines will support our router to cut a rabbet to exactly the depth of the planking. A 3 hp plunge router is the correct tool here. Smaller ones will work, but they can’t do the work in one pass like the big boy does. To support the other side of the router base, we use a 5/8″ strip with a ¼” x 1″ back piece glued and screwed on standing proud of the strip to guide the router’s path. Take a look at the picture of this method and you will think, “Oh, that looks so easy!”.
Actually, it is very easy, but some accurate measuring must take place to properly set the guide strips to assure a consistent rabbet width of ¾”. To determine the distance the guide strip is set away from the keel or chine, measure the distance from the outside edge of the router base plate to the opposite side of the router bit. Subtract ¾” from that measurement. That will be the distance between the inside edge of the keel or chine at the frame to the inside edge of the guide strip where the outer edge of the router base makes contact. A spacer block can be used to set the guide strips the correct distance from the keel/chines. Understand that the spacer block doesn’t work where the rabbet rotates around at the forward chine. Measurements from the old chine come in handy to properly place the outer edge of the rabbet. Mark the chine where the outer edge of the rabbet should be. Recall the measurement from the router base plate edge to the opposite side of the router bit. The inside edge of the guide strip should be set at that distance measured away from the mark. With the guide strips screwed in place to the frames, it is time to start making wood chips fly. A couple of words of caution are appropriate here. Protect your eyes, lungs, and ears with proper protection. When the router starts chewing wood, it creates debris in great amounts and is quite noisy. Also, know what you are doing with a router before you start. It is a great labor saving tool, but improperly used, it can be very damaging to boat and body in a blink of an eye. Check out the instructions first and practice on scrap wood, if necessary.
 On to the routing! Set the depth of the bit for the thickness of the planking intended, in this case 5/8″. Be sure to move the router from left to right with the guide strip at the “top” of the router base. The pressure of the rotating bit will force the router away from the rabbet and against the guide strip allowing the strip to serve its purpose. If incorrectly moved from right to left, the router bit will pull into the rabbet and away from the guide strip and will destroy your chine. Follow this instruction and do it right the first time. With the router base plate resting against the inside edge of the guide strip, start the router and plunge it into chine/keel to start the cut. Move the router along its path while the guide and the bit do all of the work. If your router bit is less than ¾”, use a chisel and a block plane to remove the remaining web of wood to the depth of the rabbet. The most difficult part of this process is the need to physically climb onto the bottom of the boat to attach the strips and do the routing for the keel. Lay some 2′ x 4′ pieces of scrap plywood over the frames for a place to kneel while working. Be careful! A leg falling through the frame work here is akin to your foot slipping off your bicycle peddle. Yikes!! You will need to finish cutting the rabbet with a chisel and rabbet plane where the keel attaches to the foot or gripe at the stem and on the chines where they attach to the stem. This area has limited room or support for the router to do its job.
There are probably better/different methods for cutting rabbets, but this method works great and it is accurate. It isn’t difficult to do. It just requires a little thought and preparation and the right tools. If you need any further explanation of this process, feel free to call me at 612-432-4345.

