(or The Task That Is Really Boring)
As soon as we get done with one scary process of cutting rabbets in the chine and keel, portrayed in the previous Boat House Gadgets and Kinks, another task having to do with rebuilding boat bottoms rears its ugly head. Yes, I am speaking of drilling that intimidating shaft hole in the keel.
What is there that scares you the most about this task? Is it the size of the hole, the angle that it needs to be bored, and /or the idea that you have one shot at making it right. With any new a task, there needs to be some understanding of the process from beginning to end. Once understood, the process will be less daunting.
 This hole is intimidating most probably because it is drilled at an oblique angle rather than just straight in at 90 degrees to the keel. If it is attempted to drill a small hole at an angle through a piece of wood, most likely the drill is started at a 90 degree angle to the board to drill in a short way for “foot hold”, This keeps the drill bit from skidding away from the intended entry point. In drilling the shaft hole, that crude method isn’t used to realize an accurately placed hole.
This is a simple and accurate method for drilling a hole at the exact angle and center of the shaft hole as was in the old keel by use of a guide for the drill bit. The method requires only basic tools and is suitable for a small runabout. Tools and equipment need to get bigger according to the size of the boat. The tools required for this task are: a 3/8″ drill motor, a 12″ long ¼” drill bit, a 1 ¼” spade bit and 12″ extension, a bevel gauge, a tri-square, tape measure, a compass and a pencil and a clear mind.
 Start by determining angle of the hole in the old keel. Place the blade of the bevel gauge in the hole and fold the handle of the gauge back against the keel. If the blade and the handle are tight against their respective surfaces, the angle will be captured and can be transferred to the drill guide. The drill guide is a piece of ¾”scrap lumber cut to the angle of the hole and screwed to a base used to provide a solid means of attachment to the keel during the drilling process. On the top of the guide, make a length-wise channel where the drill bit can lay and be held laterally in the correct position. This can be done by using a router or a table saw to remove material to make the channel.
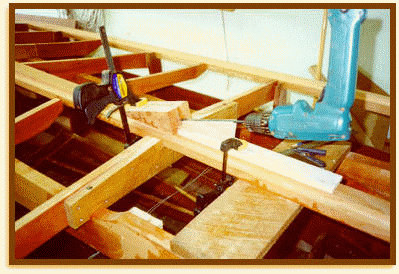
Refer to the first picture and see that there is a block cut to size as a point of entry for the drill. This allows a square entry for the drill bit. The face of the block where the bit enters should be at a 90 degree angle to the angle of the shaft hole. The block should be of sufficient size to cover the new hole area and contain the drill bit as it passes through. If the drill bit were allowed to become exposed, the bit could easily wander and chatter which would ruin the process of making a straight, clean hole. With these accessories available for the drilling process, it is time to determine where to drill the hole.
Measure from some reference point common to both the old and new keel, such as a bolt hole or the aft end of the keel, to the forward most point of the shaft hole on the old keel. Transfer that measurement to the new keel. With a tri-square, draw a line across the keel at that point. Now, with a compass mark a 1¼ ” diameter circle on the end of the block into which the drill will enter. With the tri-square, draw a line tangent to the top edge (90 degrees to the centerline) of that circle across the block. Extend that line around to the side of the block with a pencil. That line must be drawn to the angle of the shaft hole when the block rests on the keel. Use the bevel gauge to accurately mark that line using the bottom edge of the block as the angle base. Also, determine and mark the centerline on the keel and the block with respect to the center point of the circle. Position that block on the keel so that line on the side of the block and the line drawn across the keel meet. Be sure the centerline of the block also lines up to the centerline of the keel. So done, the projected hole will be perfectly aligned and positioned to the keel. Hold the block to the keel with a clamp and securely screw the block in place. Be sure no screw is placed in the path of the 1 ¼” drill bit. It is also necessary to place a block of wood under the keel also where the drill bit will exit the keel it too should be of sufficient size to contain the drill bit until the bit has passed through the entire hole. In other words, the drill should “think” that it is drilling through a solid block of wood from one end of the hole to the other.
With the block in place, it is time to line up and secure the drill guide. Place a 12″ long ¼” drill bit in the channel on the top of the guide. Move the guide for or aft as necessary to cause the center of the drill bit to touch the center point of the 1 ¼” circle. Be sure the centerline guide is lined up with the centerline of the keel. With everything square and true, clamp the drill guide firmly in position.
It is time to drill the hole. It will be done in two steps. The first step is to drill a pilot hole with 12″ long ¼” drill bit using the drill guide to assure the hole path is straight and at the correct angle. As the drill progresses into the material, the guide will eventually be in the way for drilling any further. Since the drill bit has entered a considerable distance, the guide can be removed and the remainder of the hole can be drilled unaided. Now replace the ¼” bit in the drill motor with a 1 ¼” spade bit attached to a 12″ long extension.
Reposition the drill guide again so that the extension lies in the channel and the point of the drill bit is centered in the hole previously drilled. You will have to jack up the drill guide with some scrap boards to accommodate the extension on the spade bit. The drill guide may not be totally necessary at this point but it allows for a straight start into the hole. It can be removed as the drilling progresses because the ¼” hole drilled full length of the projected shaft hole acts as a guide for the point of the spade bit. Begin drilling. Go slowly to allow the spade bit to eat away material at its own speed. Remember that the drill is passing through end grain which makes the going a little tougher. Continue drilling until it is assured that the bit has drilled to the forward most point of the shaft hole and has passed all the way through the keel. Remove the drill from the hole. Unscrew and unclamp the guide and drilling block from the keel and step back to admire your work. It is not much more difficult than drilling a regular hole, it just takes a lot more preparation to assure the angle of the hole is correct.
 Now all the worrying that went on before this process started was for nothing, wasn’t it? Some of the most difficult looking tasks are really very basic in nature. Think through your next challenging task, and be in control of the situation. It is easier when you think.