by Jerry Petersen
At the age of 70, my 1934 16 foot split cockpit GarWood let me know its time for a new bottom. This was my first antique wooden boat acquisition. I found her in an Oconomowoc, WI boat storage building back in 1984. Since we were born the same year, I decided we were destined to find each other.
She was in very good original condition, having been in storage for over 25 years in the boathouse of the original owner! The leather was rotten and the engine needed an overhaul, but the deck and sides were in great shape. After replacing the aft portions of two bottom planks, giving the bright work a re-varnish, sanding and painting the bottom, rebuilding the engine and re-upholstering, she was ready to go. I named her Silver Fox after GarWood himself, and she has given me twenty years of great enjoyment. In fact, she was the first boat I took to a Minnetonka Rendevous. That was back in the late 1980s. I remember, she won The Best GarWood award at the show. However, I do recall taking on a lot of spray as I motored from a launch site on the eastern end of the lake to Excelsior Bay.
This small GarWood is not designed to be run dry in over one foot waves! Jumping to the present, this summer I found three soft spots on bottom planks that were beyond a patch. Hence I decided it is time for an entirely new bottom.
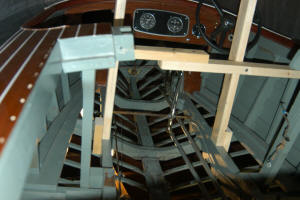 As you may recall from my BOATHOUSE articles in the mid 1990s, I had the experience of restoring a pattern 1939 GarWood utility, including putting on a new 5200 bottom. The first task is to build support legs attached to the stringers in the front and aft seat compartments. Figure 1 shows the legs and side bracing I placed in Silver Foxs front compartment. For the prior project I had designed and built a belt system for turning over small woodies. I had also constructed a dolly frame to support the legs allowing the boat to be moved around once turned over. It is simply a rectangular frame with casters at each corner. I narrowed it to match the spacing of the stringer legs on the Silver Fox since this boat is narrower.
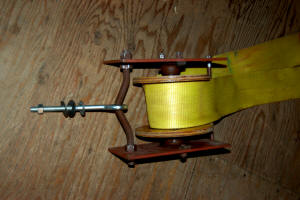 Figure 2 shows the belt and pulley I use for boat rotation. In this case, I raised the boat off its trailer in my shop with block and tackles attached to the lifting rings and slipped the rotation belt to the center of gravity of the boat. I then attached the belt pulley overhead and made final adjustments before removing the trailer. The block and tackles were then removed and four of us rotated the boat. The first 90 degrees goes very easily, since the center of gravity drops when the boat is moved to its side. However, the second 90 degrees required some force. We used a strap and one of the block and tackles to finish the rotation. Sorry, we were too busy for photos of the rotation.
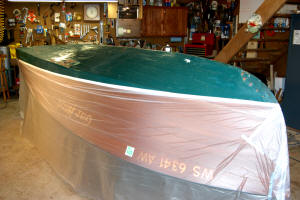 Since, I wanted to protect the mint side finish, I attached plastic drop cloth sheeting at the water line all around as show in Figure 3. This was followed by bottom paint stripping and sanding. All the bottom plank screw plugs needed to be exposed.
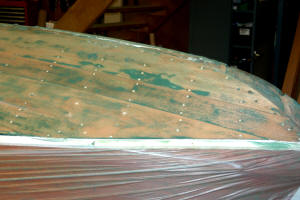 Figure 4 shows the plugs exposed after sanding the bow planks. It was interesting to me that most of the original bottom screws were plugged with caulk, but the ends of each plank were plugged with mahogany wood plugs. This boat has five planks from keel to chine. The inner four are divided into aft and forward portions with butt block joinery. Since there were about 1,000 screws to remove, I set up my air line over the boat to blow out caulk and plug fragments as I opened up each screw hole with a pick.
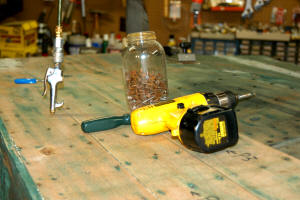 Figure 5 shows my air blow gun supported by a bungee cord over the hull. I used my DeWalt battery powered driver to remove the screws. It was a joy to find that all the original brass screws came out clean. My GarWood utility pattern boat, and my Shepherd hardtop transom, had many steel screws from prior botched restoration attempts. Those screws had to be removed by cutting a cylinder of wood out around the screw and then using a vice grip on the screw once the plank was removed. No such problem with these original brass screws, even after 70 years!
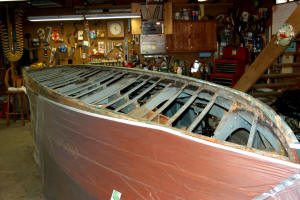 As shown on Figure 6, all the outer bottom planks and the diagonal inner planks have been removed. The inner planks were tacked to the keel and chine using brass tacks. The canvas placed between the two tore sticking partly to each bottom layer as the outer planks were removed. I found some rot in the aft three feet of each chine, but the keel and transom frame look fine, as do most of the ribs. It is interesting that GarWood intentionally make this small boat light by thinning up all the wood. The outer bottom is 0.4 inch, and the inner only 0.18 inch thick. I plan to use 4 mil Okoume marine mahogany plywood for new the inner layer. I will use the original planks for patterns augmented by temporarily attached Lauan plywood edges, but that will be the subject of a future article on this project. Nothing like a good wooden boat project to pass time over the winter if you have a heated shop with a good sound system close to your home. I now have my lumber list and will be acquiring all the wood needed over the next month.