by Jerry Valley
 Well, so much for getting this project finished in 2 years! In Part 1 of this article I covered the purchase of the boat, the photo documentation during the teardown process and the replication/refinishing of the interior furnishings and windshield frames.Next came the stripping and fairing of the hull in the spring of 1997. This was a very tedious process and took much longer than originally anticipated. There must have been ten layers of paint on that hull! I didnt keep track but Im sure I applied at least 15 coats of the strongest stripper I could find to get the hull down to bare plywood. I then sanded the hull, first with 80 and then with 120 grit sandpaper.
Experience with my larger Lyman had taught me that the hull paint had a tendency to begin to crack along the grain of the plywood after little more than a year. To stabilize the plywood on this project I decided to use Smiths penetrating epoxy. This product is the consistency of water and is applied in continuous wet coats until no longer absorbed by the wood. After allowing this to thoroughly dry for about a week I proceeded to fair the hull using a fairing epoxy also made by Smiths. This product is about the consistency of peanut butter and was applied using a putty knife slightly wider than the hull planks. While this is a sandable product, it is important to apply only what is needed because it really clogs up the sandpaper quickly. I might add that sandable is a relevant term when used in regard to this product. I applied about three coats of this product and sanded with 80 and then 120 grit paper between each coat.
When the hull was adequately faired, I applied 2 coats of an epoxy primer also made by Smiths, sanding between coats with 150 grit. By the time this process was finished, it was time to put the boat in storage for another winter.The spring and summer of 98 has brought a lot of progress. First step was to take the boat off the trailer and invert it so the bottom of the hull could be addressed. While it was in good condition, it had many layers of bottom paint that needed to be removed. For this I carefully used a belt sander. Be sure to wear a mask when sanding off anti-fouling paint. There are some nasty ingredients in there that I can tell you from experience are very irritating to the nose and throat. After some minor filling of dings and screw holes, I applied two fresh coats of copper bronze anti-fouling paint.Next step was to re-establish the waterline which had been lost during the stripping process. Unlike some boats, mine did not have a waterline scribed in the hull planks.
Using the pictures I had taken during the teardown process, I was able to determine a start and finish point for the waterline. I then adjusted the boat so that these two points were at the same elevation fore and aft and side to side. I then used a technique learned form Sherwood Heggen to figure out where the waterline should be between the two known points. This technique entails using a clear plastic tube, longer than the waterline, and filled with a colored liquid. With the help of an assistant, a mark is made every 6-12″ along the hull whenever the top of the liquid is at the waterline mark. The top of the water at the other end of the tube is then also at exactly this same point and the mark is made.Use a tube at least 3/8 inside diameter to minimize errors caused by the meniscus of the fluid. Once this process has been completed on both sides, merely connect the dots with masking tape to a fair curve and you have the location of the waterline. Simple and accurate.I next applied 3 coats of white hull paint and applied the waterline stripe.
These are tasks made much easier when the boat is upside down. While the hull was off the trailer, I took the opportunity to have the trailer sandblasted, primed and painted. I also installed new carpeting on the bunks as well as a new winch, hitch , safety chains and lights. The hubcaps were sent out for much needed replating. Incidentally, if you are looking for a place to have your trailer done, I can highly recommend Brighton Sandblasting in Blaine. They were reasonably priced, gave me one week turnaround and are equipped to do painting as well as sandblasting.Once the trailer restoration was completed it was time to turn the hull right side up once again and get on with the rest of the project.With the exterior of the hull essentially completed except for the transom, the newly varnished spray rails and new Lyman badges were installed. Now it was finally beginning to look like the boat I had envisioned. I also sprayed the interior of the hull with sand colored, water repellent stain.
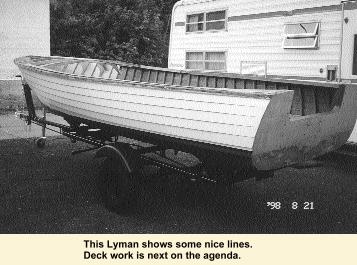
Were I to do it over again, I would not use this product as it still isnt completely dry after four weeks. This boat originally had plywood decks. These are being replaced with solid mahogany planks. To accommodate installation of the planks, I had to install battens to bridge the deck beams. This was done using a router and a special jig to inset the battens flush with the top of the beams. As this article goes to press I am in the process of rough-fitting the decking. It will then be removed, properly bedded with Sika-flex, reinstalled and all the bungs put in place. Hopefully all this will be completed before the snow once again flies.
Another change that I am making to the boat in the interest of improving the overall appearance is to install ceiling boards to the inner hull sides. These are thin boards, approximately ¼ x 3 wide that run the length of the interior from the gunwale on down. In this case, there will be five boards per side with 1/8 spacing between the boards. These have been fitted, removed, stained and varnished, and are now ready to re-install. Fitting the ceiling boards proved to be quite a challenge because of the large amount of fore and aft and vertical curvature in the hull. Fortunately the thin cross section of the boards makes them fairly easy to twist and bend into shape without resorting to steaming.
The original budget I had established for this project was $3000. While I dont know the exact number, I do know that I am still under my target and expect to finish the project under budget, but it will be close. Major expenditures since the last article have been $250 for trailer restoration and $200 for plating. The only remaining major expense will be new glass for the windshield and side windows which I estimate at about $250.
Lets hope the final article for this series is not another two years away!
Thank you, Jerry. One more boat saved!
Where have all the Lapstrakes gone? We the BSLOLers should resurrect a few more of these good-looking boats. It is an economical way to get into classic wood boats and they are are a great riding boat. And, as usual, what do we say? Dont Destroy It; Restore It!