(or do we need to talk like this?)
by Sherwood Heggen
In the wooden boat construction world, as well as the woodworking world, there are terms pertaining types of joinery which have odd names. Where did they come from? Does it matter? To some, perhaps, but not here. We just want to understand what the terms stand for in our restoration effort, where they are found, and how they are made.
During this session, we are going to better understand how a few of these terms apply to our boats and how to incorporate them in our restoration effort. Interestingly, all of the joints we are going to discuss are similar in that they are all a form of the lap joint.
Let’s start with the basic lap joint. Here, the ends of two boards lay over each other and are joined at that junction. In wooden boats, you will often find this joint holding the upright side frames to the bottom frames where the chines are attached. This joint is easy to do in that, as the name applies, the end of one frame member lays or laps over the other. Mechanical fastener, such as screws or bolts, secure the joint. The joint in this fashion is as strong as the holding power of the mechanical fastener and isn’t a particularly good joint if subjected to a lot of flexing as if it were an elbow. The fasteners and wood eventually loosen or break destroying the integrity of the joint. Introducing a bonding agent to secure the joint such as 3M 5200 or epoxy will increase the joint’s strength markedly.
Let’s consider the butt joint next found on the planking of the bottom and topsides of your hull. Here, two boards whose ends are cut square, are butted up to each other. This joint’s strength comes from, again, a lap joint. On the back of the butt joint is a butt block which laps over each end of the board with fasteners passing through plank into the butt block securing the joint. Here, too, the joint is only as strong as the wood and fasteners and a bonding agent would provide additional strength.
The last joint we are going to mention is the scarf joint. This is probably the most difficult joint to make in the restoration of your boat. It can be difficult to cut correctly and its strength is dependent on its tight fit to make a strong glue line. A tight fit is a product of skilled woodworker’s joinery skills. Let’s discuss where the scarf joint is used and how it is supposed to look.
A scarf joint is essentially a lap joint joining two boards together at their ends. Rather than the ends being cut square as in a butt joint, the ends are cut at opposite acute angles which match perfectly to each other. Done well, the joint, properly fastened and bonded is as strong as the single piece of wood. The joint is readily found on frame members on new construction where a single piece of wood is not available to be of sufficient length. In restoration, scarfing is the answer to replacing a portion of a rotted stringer, chine, or keel.
Let’s consider how to do a scarf joint to replace the rotted portion of a stringer. Just because the stinger is rotted, there is no reason to destroy the boat; restore it. Scarfing accomplishes cutting off the rotted end of a frame member and replacing it with a new piece with no loss of strength. For maximum strength, the scarf joint surface should be at 90 degrees to the expected flexing forces. For example, the stringer has flexing forces are up and down, not side ways. Therefore, the scarf joint surface will be done 90 degrees to that force. The basics of a good scarf joint is that the matting surface of the joint should be 8 to 12 times the thickness or depth of the material at the joint. Longer is better because it starts to take on the characteristic of a lamination of two pieces together.
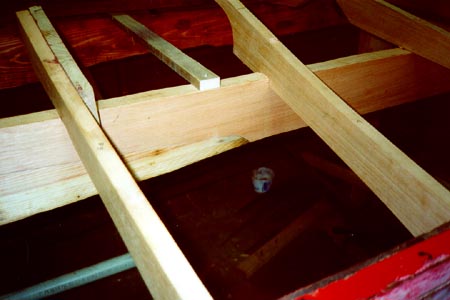
 Take a look at the picture of a scarf performed on a stringer of a runabout. You will see this scarf cut is actually a very long “S”.
The picture below shows in closer detail the “S” shape at the end of the scarf joint. This shape helps lock the joint in position and increases the angle of the scarf over a shorter distance effectively making it a longer joint, increasing strength.
Doing a scarf joint on a member large or small requires some skillful cutting. The stringer in the picture was done with a saber saw, a block plane, a wood chisel, and some snap-line chalk.
 The first step in making a scarf on any size member is to lay out the scarf joint line on the good portion of the member to be scarfed. The objective here is to replace the rotted or broken portion of the member. Remember the length of the joint should be 8 to 12 times the depth of the stock at the joint. You will need to cut into good material to accomplish the joint. In this case pictured here the stringer was about 5″ deep at the joint so a 40″ long scarf joint was chosen. Once marked, carefully saw to the line. Clean up any variances from the straight line intended with the block plane. Now, lay the shortened member on top of the new stock that will replace the rotted or broken portion. Adjust the part for dimension and position and clamp it in place. With a black felt tip pen, trace the scarf joint line from the cut member to the new stock. Carefully cut to the line. Lay the cut parts together and check for accuracy of the cut. There certainly will be some gaps, but where are they and how do you get rid of them? Remember, you already cleaned up the good portion of the member. Take some snap-line chalk and rub it liberally on to joint surface of the good portion. Put the two parts together and scrub them against each other to wear off the chalk onto the new part. When you look at the results, you will see the high spots have chalk on them. Plane off the high spots and repeat the scrubbing of the parts against each other to mark the new high spots. After a few repetitions of this process, you will have a joint whose surfaces match nearly perfectly. Removal of a small amount of material can cause a major change in alignment of a long member, so check as you go to make sure you are not causing the misalignment of the two parts. Try not to remove material past the line made to mark the joint. When you can not see daylight through the joint, you have finished fitting, you are a master at joinery.
OK. Let’s say you have a perfect fit. What next? For maximum strength, bonding the parts together with 3M 5200 or epoxy and micro fibers for a filler is ideal. Before you bond them, though, dry fit and clamp them together. Pre-drill for screws or bolts and screw/bolt it together to make sure every thing fits the way it is supposed to. Satisfied with the fit, take the screws/bolts out and apply the bonding material to the joint and reassemble securing it finally with the screws/bolts. Double check that the joint is positioned as you would want it to be and then set it aside to cure. You are nearly finished. After the bonding material is cured, clean up the joint with a belt sander where the bonding material oozed out.
Though it isn’t stated here, a backer block spanning past either side of the joint is a consideration for insured strength. For the stringer discussed in the above text, a minimum of three bolts through the joint over the length of the joint insures it will hold together.
You will be impressed with how well you did and the fact that you have given that frame member a new lease on life. This is only one way to make a scarf joint. For every type of part, the scarf joint will vary. Keels are scarfed differently from chines which are scarfed differently from frames, etc. The detail that remains the same is that the length to depth ratio is 8 to 1 or greater.
And now, a new feature of Gadget and Kinks is Product Review. Lacking time and space in this segment, only a quick review will be of the two popular adhesive/sealant products Sikaflex and 3M 5200. After going through many tubes of the stuff, here is the definite conclusion of the most apparent difference between the two. 3M 5200 smells much better! So there you have it. Go from there.
Seriously, it would be interesting to hear from you fellow restorers as to what your favorite tools and restoration tricks are out there. It would be great to share them with others in the chapter through Gadgets and Kinks. I invite you to call me at 612/432-4345 or e-mail me at Heggensj@AOL.com to let me know what works for you and I will pass it along.
Finally, give restoration a try. Start with something simple and work into more challenging projects. You will find it a rewarding experience. Give me a call if you have a question on how to. That’s what I’m here for.