by Jerry Petersen
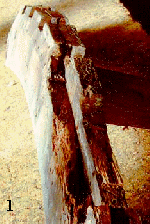 Last fall, my BOATHOUSE article showed the gaping hole at the back of my 24 foot Shepherd hardtop. At that point, I had removed all the decayed old wood. I have a lot ahead of me in the restoration, but I now have my new transom frame basically done. As I mentioned last fall, Shepherd used four quarter laminated unsealed mahogany for the transom frame. As shown by the old side frame in Figure 1, this wet sandwich was a focal point for rot. Hence, I am replacing it with CPES sealed white oak. I am also using eight quarter (2 inch think) oak for the side frames, rather than a sandwich of two, four quarter boards..
I started with the top transom frame or bow. This was the trickiest piece, since it has curves in all three dimensions. First, I make cardboard templates to record both the horizontal and vertical curvatures. I then decided to handle the horizontal curvature by laminating seven, two quarter (half inch) white oak planks with West System epoxy in a jig made to the exact curvature needed.
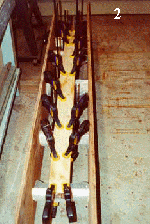 Figure 2 shows planks being bonded in the jig. I just added another plank each day until all seven were laminated. As you can see, its easy to run out of clamps in a task like this.
The next step was to cut the horizontal curve on my band saw. This worked well, but there were two more shaping details required.
The top outboard edge of the bow has a 45 degree bevel (Figure 3) where a mahogany transition piece between the aft deck and the top transom plant is secured. I formed that with a hand power plane. Finally, there was an eleven degree taper needed on the outboard vertical surface, since the transom is not at right angles to the deck. I also managed that with my hand power plane. My new top frame (bow) is now secured to the deck stringers with new eight quarter angle brackets. Shepherd used end grain screws.
Figure 4 shows one new side frame. The eight quarter angle bracket securing it to the lower transom frame is also visible.
Figure 5 shows that I am installing an eight inch long, three eighths inch diameter, silicon bronze bolt all the way through the chine, the side frame, the bottom frame, and the angle bracket. This is the construction GarWood used in his transom framing. It makes sense to me, since it really ties everything together.
Figure 6 shows all the basic transom frame members in place. Before installing the new transom mahogany exterior planks, I have a lot of interior work to do. Rewiring, bilge painting, and replacing some of the side angle frame brackets. Ive also decided to replace the lowest mahogany planks on each side to get better sealing at the chine, and to get a chance to do some epoxy protection of the chine while I have the boat open. However, before that, Im taking a six week break in Florida. Im taking my 19 foot GarWood to Mt. Dora, however, I understand the water level is really low (a 100 year record drought). Im also told, boating through many of the canals is questionable. This is probably not the year to do the St. John. Anyway, itll be a good break from our northern winter. More later.